
Method 1 of 8: Creating a Table
-
 1Open a workbook (spreadsheet) or have one already open.
 -
 2Select a range of cells, if you wish. If you have already determined which cells will make up your table, you can select that range of cells now. You can change this range later when you create the table.
 -
 3Create the table.
- To create a list (table) in Excel 2003, select "List" from the Data menu.
- To create a table in Excel 2007 or 2010, select the range of empty cells or cells containing data that you want to have in your table. Then, either select "Table" from the Tables group on the Insert menu ribbon or select "Format as Table" in the Styles group on the Home menu ribbon, and select one of the table styles. (The former option applies Excel's default table style, while the other lets you choose a style when you create the table. You can later apply or change the table style by selecting one of the options from the Table Styles group in the Table Tools Design menu ribbon.)
-
 4Provide a data source for your table, if you did not previously select a group of cells. After you perform the appropriate action from those listed in the previous step for creating a data table or list table, a dialog box will appear, either the Create Table dialog (Create List dialog in Excel 2003) or the Format As Table dialog. The "Where is the data for your table?" field displays the absolute reference(s) for the current cell(s) selected. If you want to change this information, you can type in a different cell or range reference.
 -
 5Indicate whether your table has headers. If your table has headers, check the "My table has headers" box.
- If you don't check this box, the table will display default header names ("Column 1," "Column 2," etc.). You can change a column name by selecting the header and typing in your own name in the formula bar.


EditMethod 2 of 8: Enlarging and Reducing Table Size
-
 1Move your mouse cursor over the sizing handle at the lower right corner of the table. Your cursor will change to a 2-headed diagonal arrow.
 -
 2Drag your cursor inward to reduce the table size, outward to enlarge it. Dragging your cursor adds or reduces the number of rows and columns.
- Dragging your cursor up toward the column header reduces the number of rows in the table, while dragging your cursor down increases the number of rows.
- Dragging your cursor to the left reduces the number of columns in the table, while dragging it to the right increases the number of columns. A new column header is created when a new column is added.


EditMethod 3 of 8: Inserting Table Rows and Columns
-
 1Right-click the table cell where you wish to insert a row or column. A popup menu appears.
 -
 2Select "Insert" from the popup menu, and choose one of the Insert submenu options.
- Select "Insert Columns to the Left" or "Insert Columns to the Right" to insert a new column in the table.
- Select "Insert Rows Above" or "Insert Rows Below" to insert a new row in the table.


EditMethod 4 of 8: Deleting Table Rows and Columns
-
 1Right-click the table cell(s) where you wish to delete a row or column. A popup menu appears.
 -
 2Select "Delete" from the popup menu, and choose one of the Delete submenu options.
- Select "Table Columns" to delete the entire column(s) containing the selected cell(s).
- Select "Table Rows" to delete the entire row(s) containing the selected cell(s).


EditMethod 5 of 8: Sorting Table Rows
-
 1Click the down-arrow to the right of the header of the column you wish to sort by. A dropdown menu will appear.
 -
 2Choose one of the sort options displayed. The sort options appear at the top of the dropdown menu.
- Choose "Sort A to Z" (or "Sort Smallest to Largest" if the data is numeric) to sort items in ascending order.
- Choose "Sort Z to A" (or "Sort Largest to Smallest" if the data is numeric) to sort items in descending order.
- Choose "Sort By Color" and then select "Custom Sort�" from the submenu to set up a custom sort. If your data is displayed in multiple colors, you can select one of the colors from this submenu to sort your data by.
- You can access additional sort options by right-clicking on any cell in a column and selecting "Sort" from the popup menu. In addition to the options above, you can also sort by cell or font color or by cell icon.


EditMethod 6 of 8: Filtering Data in Tables
-
 1Click the down-arrow to the right of the header of the column you wish to filter data by. A dropdown menu will appear.
 -
 2Choose one of the filtering options displayed. Three sets of filtering options are available: "Filter by Color," "Text Filters," and "Number Filters." (The "Text Filters" option is displayed only when the column entries contain text, while the "Number Filters" option is displayed only when the column entries contain numbers.) Below that is a set of check boxes.
- The "Filter by Color" option is enabled when the text or numbers are show in multiple colors. Select the color you wish to filter the data by.
- The "Text Filters" option includes the options "Equals," "Does Not Equal," "Greater Than," "Begins With," "Ends With," "Contains," "Does Not Contain," and a "Custom Filter" option.
- The "Number Filters" option includes the options "Equals"," Does Not Equal," "Greater Than," "Greater Than or Equal To," "Less Than," "Less Than or Equal To," "Between," "Top 10," "Above Average," "Below Average," and a "Custom Filter" option.
- The check boxes below these options include a "Select All" and "Blanks" option to display all data meeting the filtering criteria or all rows with blank cells in that column, as well as a listing of each unique data element (such as the same name) in that column. Check or uncheck the combination of boxes that will let your display only those rows with a cell that meets your criteria, such as checking the elements "Smith" and "Jones" to display sales figures for only those 2 individuals.
- Excel 2010 offers an additional filtering option: enter text or a number in the Search field and the display will be restricted to only those rows with an item in the column that matches the contents of that field.
-
 3Remove the filter when finished with it. To restore the original display, select "Clear Filter From [Column Name]" from the dropdown menu. (The actual name of the column is displayed in this option.)


EditMethod 7 of 8: Adding a Totals Row to a Table


EditMethod 8 of 8: Adding a Calculated Column to a Table
-
 1Select a cell in a blank column. If necessary, you'll have to add a blank column first. See "Enlarging and Reducing Table Size" and "Inserting Table Rows and Columns" for the methods to do this.
 -
 2Type the calculation formula into any blank cell, other than the header. Your formula is automatically copied into all the column's cells, whether above or below the cell you entered the formula in. You can also copy the formula into the column cells manually.
- You can enter the formula in any row of the spreadsheet beneath the table, but you can't refer to any cells in those rows in the table reference.
- You can type or move the formula into a column that already has data, but to make it a calculated column, you'll need to click the "AutoCorrect Options" button to overwrite the existing data. If you copy the formula, however, you'll have to manually overwrite the data by copying the formula into those cells.
- After creating the calculated column, you can later go back and create exceptions by typing data other than a formula in any of the cells, deleting the formula from 1 or more cells, or copying a different formula into some of the cells. Any exceptions to the calculated column formula, other than a formula deletion, will be clearly marked.
A Pivot Table is way to present information in a report format. The idea is that you can click drop down lists and change the data that is being displayed. For example, choose just one student from a drop down list and view only his or her scores. Pivot tables are a lot easier to grasp when you see them in action. Here's the one we're going to create in this section: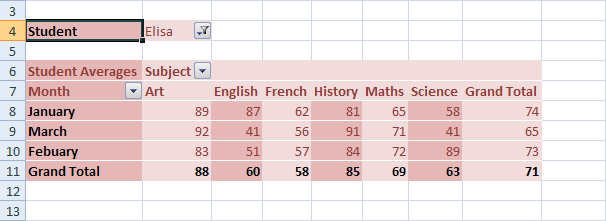 Look at Row 4. This shows that the student is Elisa. If we click Elisa's drop down arrow, we'll see this:
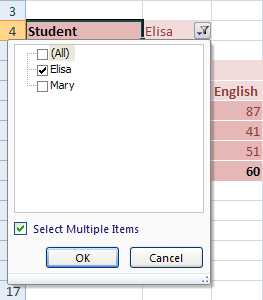 Now we have another student to select (we'll only use two students, for this tutorial). We could untick Lisa, and tick Mary instead. Then her scores would display.The Subject and Month cells also have drop down lists. So we could view only January's scores, and just for Art and English, for example.
So this is a Pivot Table - a report that we can manipulate by selecting items from drop down lists. Let's make a start.
The first thing you need for a Pivot Table is some data to go in it. Instead of typing all the data out, you can simply grab ours. Go to this web page on our website and save the spreadsheet to your own hard drive:
Download the Data for the Pivot Table (Right click and select Save Link/Target As)Once the spreadsheet is on your own computer, open it up. You should see this (If you get a warning across the top, click on Enable Editting):The Pivot Table Data in an Excel Spreadsheet (New window)Highlight the data that will be going in to your Pivot Table (cells A1 to D37).On the Excel Ribon, click the Insert tab. From the Insert tab, locate the Tables Panel.
 On the Tables panel click Pivot Tables. The Create Pivot Tables dialogue box appears:
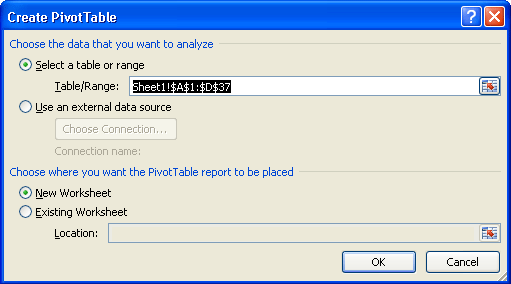 In the dialogue box above, the data that we highlighted is in the Table/Range textbox. You can select different cells by clicking the icon to the right of the Table/Range textbox. You can also specify an external data source, such as a text file, for the data in your Pivot Table.We've selected a New Worksheet as the place where the Pivot Table will be placed. Click OK.
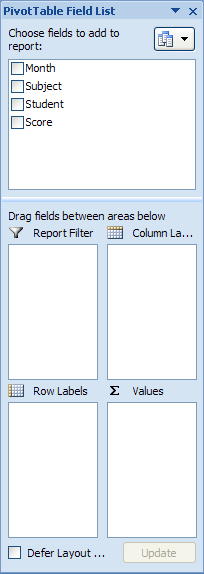
When you click OK, Excel presents you with a rather complex layout. The area on the right should look something like one of these below, depending on which version of Excel you have:
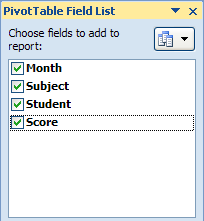
 It helps to have a look again at what we're trying to create. Here's the completed Pivot Table again:Now take a look at the Pivot Table Field List image again, the one above the completed pivot table. It has tick boxes for Month, Subject, Student, and Score. These are column headings from the original spreadsheet data. We've put the Month in cell A7 on our Pivot Table, Subject is in cell B6, Student is in cell B4, and Score is the Average scores in cells C8 to G10. You'll see how it works, though.The idea is that you tick a box in the Pivot Table Field List, and then drag it to the four areas below. Excel will take care of the rest.
So, tick all four boxes in the field list:
 Excel will create a basic (and messy) Pivot Table for you. But we're going to put our 4 fields into the 4 areas below. Here are the 4 areas we can drag to:
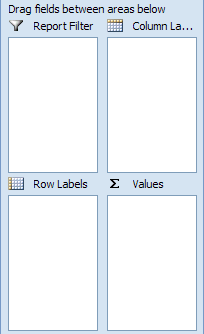 For the Report Filter, we want the name of a Student. For the Column Labels, we want the Subject, and for the Row Labels, we'll just have the Month. The Values will be the Average scores.If you look at the Field areas after you have ticked all four boxes, however, you may see something like this:
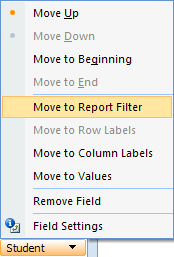
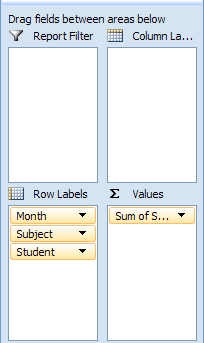 Month, Subject and Student have all been grouped under Row Labels. You can drag and drop these, though.So click on Student in the Row Labels box. Hold down your left mouse button, and then drag it in to the Report Filter box. If you don't fancy dragging and dropping, simply click the Student item with your left button. From the menu that appears, select Move to Report Filter:
 Your Field areas will then look like this:
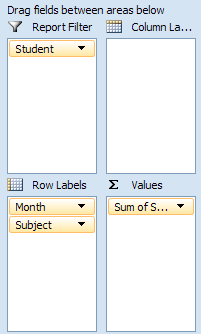 Move Subject from Row Labels to the Column Labels area:
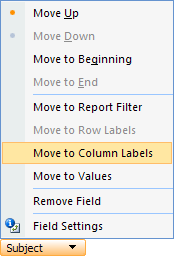 Your Field areas will then look like this:
 The Pivot Table on your spreadsheet will look a lot different, too. It should be looking like this:
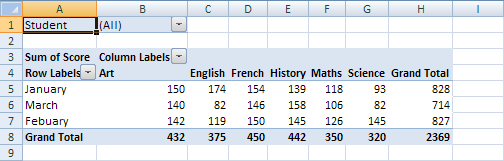 Our Pivot Table is coming along, but the scores are all wrong, and it needs tidying up a bit. We'll continue this tutorial in the next part, below.Gife example for mathematics formula using Excel:-Excel Formulas
A formula is a set of mathematical instructions that can be used in Excel to perform calculations. Formals are started in the formula box with an = sign.
There are many elements to and excel formula.
References: The cell or range of cells that you want to use in your calculation
To create a basic formula in Excel:
Operators: Symbols (+, -, *, /, etc.) that specify the calculation to be performed
Constants: Numbers or text values that do not change
Functions: Predefined formulas in Excel
- Select the cell for the formula
- Type = (the equal sign) and the formula
- Click Enter


A function is a built in formula in Excel. A function has a name and arguments (the mathematical function) in parentheses. Common functions in Excel:
Sum: Adds all cells in the argumentTo calculate a function:
Average: Calculates the average of the cells in the argument
Min: Finds the minimum value
Max: Finds the maximum value
Count: Finds the number of cells that contain a numerical value within a range of the argument
- Click the cell where you want the function applied
- Click the Insert Function button
- Choose the function
- Click OK

- Complete the Number 1 box with the first cell in the range that you want calculated
- Complete the Number 2 box with the last cell in the range that you want calculated

The function library is a large group of functions on the Formula Tab of the Ribbon. These functions include:
AutoSum: Easily calculates the sum of a range
Recently Used: All recently used functions
Financial: Accrued interest, cash flow return rates and additional financial functions
Logical: And, If, True, False, etc.
Text: Text based functions
Date & Time: Functions calculated on date and time
Math & Trig: Mathematical Functions

Relative, Absolute and Mixed References
Calling cells by just their column and row labels (such as "A1") is called relative referencing.
When a formula contains relative referencing and it is copied from one
cell to another, Excel does not create an exact copy of the formula.
It will change cell addresses relative to the row and column they are
moved to. For example, if a simple addition formula in cell C1
"=(A1+B1)" is copied to cell C2, the formula would change to "=(A2+B2)"
to reflect the new row. To prevent this change, cells must be called
by absolute referencing and this is accomplished by
placing dollar signs "$" within the cell addresses in the formula.
Continuing the previous example, the formula in cell C1 would read
"=($A$1+$B$1)" if the value of cell C2 should be the sum of cells A1
and B1. Both the column and row of both cells are absolute and will not
change when copied. Mixed referencing can also be used
where only the row OR column fixed. For example, in the formula
"=(A$1+$B2)", the row of cell A1 is fixed and the column of cell B2 is
fixed.Linking Worksheets
You may want to use the value from a cell in another worksheet within the same workbook in a formula. For example, the value of cell A1 in the current worksheet and cell A2 in the second worksheet can be added using the format "sheetname!celladdress". The formula for this example would be "=A1+Sheet2!A2" where the value of cell A1 in the current worksheet is added to the value of cell A2 in the worksheet named "Sheet2".
Macros are advanced features that can speed up editing or formatting you may perform often in an Excel worksheet. They record sequences of menu selections that you choose so that a series of actions can be completed in one step.
Recording a Macro
To record a Macro:
- Click the View tab on the Ribbon
- Click Macros
- Click Record Macro
- Enter a name (without spaces)
- Enter a Shortcut Key
- Enter a Description

- Perform the Macro
- Click Macros
- Click Stop Recording

To run a Macro from the Keyboard shortcut, simply press the keys that you have programmed to run the Macro. Or you can view all macros and run by:
- Click Macros
- Click View Macros
- Choose the Macro and click Run

Sorting and Filtering allow you to manipulate data in a worksheet based on given set of criteria.
Basic Sorts
To execute a basic descending or ascending sort based on one column:
- Highlight the cells that will be sorted
- Click the Sort & Filter button on the Home tab
- Click the Sort Ascending (A-Z) button or Sort Descending (Z-A) button

To sort on the basis of more than one column:
- Click the Sort & Filter button on the Home tab
- Choose which column you want to sort by first
- Click Add Level
- Choose the next column you want to sort
- Click OK

Filtering allows you to display only data that meets certain criteria. To filter:
- Click the column or columns that contain the data you wish to filter
- On the Home tab, click on Sort & Filter
- Click Filter button
- Click the Arrow at the bottom of the first cell
- Click the Text Filter
- Click the Words you wish to Filter

- To clear the filter click the Sort & Filter button
- Click Clear

To add a picture:
- Click the Insert tab
- Click the Picture button
- Browse to the picture from your files
- Click the name of the picture
- Click Insert
- To move the graphic, click it and drag it to where you want it

To add Clip Art:
- Click the Insert tab
- Click the Clip Art button
- Search for the clip art using the search Clip Art dialog box
- Click the clip art
- To move the graphic, click it and drag it to where you want it

When you add a graphic to the worksheet, an additional tab appears on the Ribbon. The Format tab allows you to format the pictures and graphics. This tab has four groups:
Adjust: Controls the picture brightness, contrast, and colors
Picture Style: Allows you to place a frame or border around the picture and add effects
Arrange: Controls the alignment and rotation of the picture
Size: Cropping and size of graphic

To add Shape:
- Click the Insert tab
- Click the Shapes button
- Click the shape you choose

- Click the Worksheet
- Drag the cursor to expand the Shape

- Click the Shape
- Click the Format tab

SmartArt is a feature in Office 2007 that allows you to choose from a variety of graphics, including flow charts, lists, cycles, and processes. To add SmartArt:
- Click the Insert tab
- Click the SmartArt button
- Click the SmartArt you choose

- Select the Smart Art
- Drag it to the desired location in the worksheet
- Select the SmartArt
- Click either the Design or the Format tab
- Click the SmartArt to add text and pictures.
 Charts allow you to present information contained in the worksheet
in a graphic format. Excel offers many types of charts including:
Column, Line, Pie, Bar, Area, Scatter and more. To view the charts
available click the Insert Tab on the Ribbon.
Charts allow you to present information contained in the worksheet
in a graphic format. Excel offers many types of charts including:
Column, Line, Pie, Bar, Area, Scatter and more. To view the charts
available click the Insert Tab on the Ribbon.Create a Chart
To create a chart:
- Select the cells that contain the data you want to use in the chart
- Click the Insert tab on the Ribbon
- Click the type of Chart you want to create

Once you have created a chart you can do several things to modify the chart.
To move the chart:
- Click the Chart and Drag it another location on the same worksheet, or
- Click the Move Chart button on the Design tab
- Choose the desired location (either a new sheet or a current sheet in the workbook)

- Click the Chart
- Click the Select Data button on the Design tab

- Click the Chart
- Click the Switch Row/Column button on the Design tab

- Click the Chart
- On the Layout tab, click the Chart Title or the Data Labels button
- Change the Title and click Enter

The Chart Tools appear on the Ribbon when you click on the chart. The tools are located on three tabs: Design, Layout, and Format.
Within the Design tab you can control the chart type, layout, styles, and location.

Within the Layout tab you can control inserting pictures, shapes and text boxes, labels, axes, background, and analysis.


Copy a Chart to Word
- Select the chart
- Click Copy on the Home tab
- Go to the Word document where you want the chart located
- Click Paste on the Home tab

Sometimes you will want to split data in one cell into two or more cells. You can do this easily by utilizing the Convert Text to Columns Wizard.
- Highlight the column in which you wish to split the data
- Click the Text to Columns button on the Data tab
- Click Delimited if you have a comma or tab separating the data, or click fixed widths to set the data separation at a specific size.

Modifying fonts in Excel will allow you to emphasize titles and headings. To modify a font:
- Select the cell or cells that you would like the font applied
- On the Font group on the Home tab, choose the font type, size, bold, italics, underline, or color

In Excel, you can also apply specific formatting to a cell. To apply formatting to a cell or group of cells:
- Select the cell or cells that will have the formatting
- Click the Dialog Box arrow on the Alignment group of the Home tab

Number: Allows for the display of different number types and decimal placesAdd Borders and Colors to Cells
Alignment: Allows for the horizontal and vertical alignment of text, wrap text, shrink text, merge cells and the direction of the text.
Font: Allows for control of font, font style, size, color, and additional features
Border: Border styles and colors
Fill: Cell fill colors and styles
Borders and colors can be added to cells manually or through the use of styles. To add borders manually:
- Click the Borders drop down menu on the Font group of the Home tab
- Choose the appropriate border

- Click the Fill drop down menu on the Font group of the Home tab
- Choose the appropriate color

- Click Cell Styles on the Home tab
- Choose a style or click New Cell Style

To change the width of a column or the height of a row:
- Click the Format button on the Cells group of the Home tab
- Manually adjust the height and width by clicking Row Height or Column Width
- To use AutoFit click AutoFit Row Height or AutoFit Column Width

To hide or unhide rows or columns:
- Select the row or column you wish to hide or unhide
- Click the Format button on the Cells group of the Home tab
- Click Hide & Unhide

To merge cells select the cells you want to merge and click the Merge & Center button on the Alignment group of the Home tab. The four choices for merging cells are:
Merge & Center: Combines the cells and centers the contents in the new, larger cell
Merge Across: Combines the cells across columns without centering data
Merge Cells: Combines the cells in a range without centering
Unmerge Cells: Splits the cell that has been merged

To align cell contents, click the cell or cells you want to align and click on the options within the Alignment group on the Home tab. There are several options for alignment of cell contents:
Top Align: Aligns text to the top of the cell
Middle Align: Aligns text between the top and bottom of the cell
Bottom Align: Aligns text to the bottom of the cell
Align Text Left: Aligns text to the left of the cell
Center: Centers the text from left to right in the cell
Align Text Right: Aligns text to the right of the cell
Decrease Indent: Decreases the indent between the left border and the text
Increase Indent: Increase the indent between the left border and the text
Orientation: Rotate the text diagonally or vertically

Two-way ANOVA, also
called two-factor ANOVA, determines how a response is affected by two
factors. For example, you might measure a response to three different
drugs in both men and women. Drug treatment is one factor and gender is
the other.
Prism uses a unique way
to enter data. You use rows and columns to designate the different
groups (levels) of each factor. Each data set (column) represents a
different level of one factor, and each row represents a different level
of the other factor. You need to decide which factor is defined by
rows, and which by columns. Your choice will not affect the ANOVA
results, but the choice is important as it affects the appearance of graphs and the kinds of post tests Prism can compare.
This page shows you how to enter and analyze data with repeated measurements placed in a subcolumn. Use a different 'how to' page if you enter repeated measurements in a row.
1. Create a data table and enter data
From the Welcome (or New Data Table and Graph) dialog, choose the Grouped tab.
If you are not ready to
enter your own data, chose to use sample data and choose: Two-way ANOVA
data -- RM by columns. ("RM" means Repeated Measures).
If you plan to enter your
own data, it is important that you choose the subcolumn format
correctly, for the maximum number of subjects you have with any
treatment.
Since your data are
repeated measures, you want to make a graph that shows that. Choose the
second choice on the second row of graph types, so values are connected
properly on the graph. Choose to plot each replicate, connecting each subcolumn. If you choose the sample data, Prism will automatically choose the appropriate graph.

Arrange your data so the
data sets (columns) represent different levels of one factor, and
different rows represent different levels of the other factor. The
sample data set compares five time points in two subjects under control
conditions and two after treatment.

Each subcolumn (one is marked with a red arrow above) represents repeated measurements on a single subject.
Missing values
It is OK if some
treatments have more subjects than others. In this case, some subcolumns
will be entirely blank. But you must enter a measurement for each row
for each subject. Prism cannot handle missing measurements with repeated
measures ANOVA.
2. Choose two-way ANOVA
| 1. | From the data table, click |
| 2. | Choose Two-way ANOVA from the list of grouped analyses. |
| 3. | Choose the option that specifies that matched values are stacked in a subcolumn. |

Also, choose post tests if they will help you interpret your results, and enter the name of the factors that define columns and rows.
CONCLUSION
first I did not know what to buad excel improvement, I work so that I can test my mind to make excel FTPP.
CONCLUSION
first I did not know what to buad excel improvement, I work so that I can test my mind to make excel FTPP.
Tiada ulasan:
Catat Ulasan